To submit documents using the Interactive Zoning Information System (IZIS) or to email documents to the Office of Zoning, the document must be in PDF format.
What is PDF format?
When you convert documents, forms, graphics, and web pages to Portable Document Format (PDF), they look just like they would if printed. But unlike printed documents, PDF files can contain clickable links and buttons, form fields, video, and audio — as well as logic to help automate routine business processes. When you share a PDF file, virtually anyone can read it using free Adobe Reader® software or the Adobe Reader mobile app.
Creating Files with Adobe Acrobat
Adobe Acrobat
- In Acrobat, click the Create button on the left side of the task bar and select PDF From File.
- Browse to the desired file. Click open.
- Click the Save button. Type a name for your file, and click Save.
Microsoft Office to PDF (Windows)
- Click the Acrobat menu at the end of your Office application Ribbon to display the task ribbon.
- Click Create PDF. Type a name for your file, and click Save.
Tip: To create your PDF file and distribute it to others in a single step, click Create and Attach to Email.
Print to PDF (Windows)
- From within your application, select File > Print.
- In the Print dialog box, select Adobe PDF as your printer.
- Click Print. Type a name for your file, and click Save.
Print to PDF (Mac)
- From within your application, select File > Print.
- Click the PDF button and choose Save As Adobe PDF.
- Choose the Adobe PDF Settings and click Continue.
- Type a name for your file, and click Save.
Saving a Microsoft Office document as a PDF Document (when you do not have Adobe Acrobat)
You do not need to have Adobe Acrobat to create a PDF document while working with any Microsoft Office application. Follow the steps detailed below to convert your document to PDF.
-
Click the Microsoft Office Button
 or "File" from the menu bar.
 - From the dropdown menu, select "Save As".
- While in the "Save As" window, navigate to the folder where you wish to save your converted document, and open it.
- In the "File name" box, type a name for the document you wish to convert.
- In the "Save as type" list, click "PDF" from the drop down list.
- Then click on the "Save" button at the bottom of the "Save As" window to save your converted document.
- Please note the folder your document was saved into return there while attempting to upload your document in IZIS.
-
Next to Optimize for, do one of the following, depending on whether file size or print quality is more important to you:
- If the presentation requires high print quality, click Standard (publishing online and printing).
- If the print quality is less important than file size, click Minimum size (publishing online).
- To specify various options for the file, click Options. (Find links to more information on these options in the See Also section.) Click OK.
- Click Publish.
Creating PDF Files with PrimoPDF
Below are instructions for a free PDF-creation program called PrimoPDF . It's important to realize that PDF format is an output format, meaning that it's not intended to be edited beyond very minor fine-tuning. In order to change a PDF file, you need to edit the original file in the original program (e.g., Microsoft Word), and then create a new PDF file.
Installing PrimoPDF
Note that when upgrading from an earlier version of PrimoPDF, you first need to uninstall the old version by going to Start [Settings] - Control Panel - Add or Remove Programs/Programs and Features. Once it's uninstalled:
- Go to www.primopdf.com.
- Under "Try Primo" click "Download Free"
- Download and follow directions to install
Using PrimoPDF to create PDF files
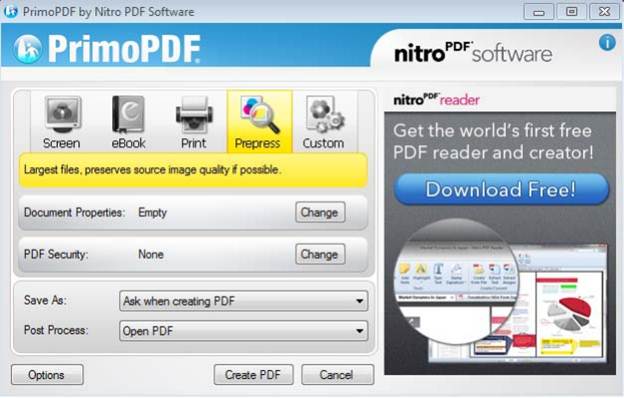
- When the PrimoPDF dialog box appears (it may take a minute), choose the appropriate setting:
- "Screen" produces low-quality files and is not recommended.
- "EBook" is okay for documents that you're putting on the web that will not be printed.
- "Print" is best for things that you expect to be printed on a laser or inkjet printer. This is a good default setting for most purposes.
- "Prepress" is for things being printed at the Copy Center or professional printer.
- "Custom" is not usually needed.
- With the Save As box set to "Ask when creating PDF," you will be prompted for the file name and location.
- The Post Process box determines what will happen after the PDF is created. If you do not want the PDF to open, change it to "Do Nothing."
- Click Create PDF. You may need to wait a moment for the next window to appear, and in some versions of Windows, it may appear behind your current window. If you don't see it, look in the taskbar.
- Choose the location and file name for the PDF file. Click Save.